The West Bend Bread Machine is a popular kitchen appliance designed for homemade bread making, offering versatility and ease of use. Its programmable features and multiple settings cater to various bread types, from classic white to gluten-free options. The machine’s dough cycle and customizable options make it ideal for pizza, rolls, and artisan crusts. Reading the instruction manual is crucial for optimal performance and safety. With models like the 41085 and 47413, West Bend provides a reliable solution for bread enthusiasts, ensuring consistent results and long-term durability.
1.1 Overview of the West Bend Bread Machine Models
West Bend offers a range of bread machine models, including the 41030, 41085, and 47413, each designed for versatility and ease of use. These models feature programmable timers, multiple bread settings, and a dough cycle for homemade pizza or rolls. The 41030 is known for its ability to make various bread types, while the 47413 includes advanced features like a delay start and customizable options. Accessories and user manuals are available for optimal performance.
1.2 Importance of Reading the Instruction Manual
Reading the West Bend Bread Machine manual is essential for proper operation and safety. It provides guidance on electrical requirements, avoiding converters, and handling hot surfaces safely. The manual details model-specific features, ensuring users understand settings and cycles. Following instructions guarantees optimal performance, prevents malfunctions, and maintains warranty validity. It also offers troubleshooting tips and maintenance advice to extend the machine’s longevity. Adhering to the manual’s guidelines ensures consistent bread-making success and safe usage.

Key Features of the West Bend Bread Machine
The West Bend Bread Machine offers versatility with programmable settings, multiple bread cycles, and a dough cycle for pizza or rolls, ensuring ease of use and consistent results.
2.1 Multiple Settings for Different Bread Types
The West Bend Bread Machine features multiple settings to accommodate various bread types, including whole wheat, gluten-free, and artisan options. These settings ensure precise temperature and timing controls, allowing users to craft a wide variety of breads with ease. The machine’s versatility makes it ideal for both novice bakers and experienced enthusiasts looking to experiment with diverse recipes and ingredients.
2.2 Programmable Timer and Custom Options
The West Bend Bread Machine offers a programmable timer, enabling users to delay baking up to 12 hours. Custom options allow for personalized bread-making, with settings for crust color, loaf size, and yeast preference. This flexibility ensures users can tailor their bread to suit their preferences and schedule, making it ideal for busy households or those experimenting with unique recipes and ingredients.
2.3 Dough Cycle for Versatile Use
The dough cycle on the West Bend Bread Machine is a versatile feature, allowing users to prepare homemade dough for various purposes. It’s perfect for making pizza crusts, rolls, and other baked goods. After the cycle completes, the dough can be shaped and baked in a traditional oven. This feature adds flexibility to your bread-making experience, enabling creative recipes beyond standard loaves. It’s a great option for those who enjoy experimenting with different dough-based dishes.
Safety Precautions and Electrical Requirements
The West Bend Bread Machine requires a 120V, 60Hz electrical service. Never use converters or transformers, as they can damage the machine and void the warranty. Always handle hot surfaces with care, using oven mitts or potholders to avoid burns. Ensure proper ventilation and keep the machine away from flammable materials for safe operation.
3.1 Understanding the 120V, 60Hz Electrical Service Requirement
Your West Bend Bread Machine is designed to operate exclusively on a 120-volt, 60Hz electrical service. Using a converter or transformer will damage the machine and void its warranty. Ensure your outlet matches these specifications for safe and proper operation. This requirement is non-negotiable, as it directly impacts the machine’s performance and longevity. Always adhere to this standard to avoid electrical issues and maintain optimal functionality.
3.2 Avoiding the Use of Converters or Transformers
Avoiding the use of converters or transformers is crucial for your West Bend Bread Machine’s optimal performance and longevity. Using such devices can severely damage the machine’s electronic control system and void your warranty. Additionally, converters may introduce electrical hazards, compromising safety and machine reliability. Always ensure your machine operates on the specified 120V, 60Hz power supply to maintain safety, performance, and warranty validity, ensuring years of reliable service.
3.4 Handling Hot Surfaces Safely
Handling hot surfaces of the West Bend Bread Machine requires caution to prevent burns. Always use oven mitts or potholders when touching the bread pan or machine after baking. Never touch hot surfaces directly, as they can cause severe burns. Keep children away from the machine while it is in operation or cooling down. The bread pan and machine exterior may remain hot for a while after the cycle completes, so handle them with care to ensure safety.

Basic Setup and Initial Preparation
Unpack and clean the machine thoroughly before first use. Locate the model number on the back or bottom for manual reference. Understand the control panel functions to ensure proper operation.
4.1 Unpacking and Cleaning the Machine
Unbox your West Bend Bread Machine carefully, ensuring all components are included. Before first use, clean the machine and bread pan with a damp cloth. Avoid abrasive cleaners to prevent damage. Dry thoroughly to prevent rust. Regular cleaning after each use maintains hygiene and functionality. Store the machine in a dry place when not in use to ensure longevity and optimal performance.
4.2 Locating the Model Number for Manual Reference
To locate the model number on your West Bend Bread Machine, check the back or bottom of the appliance. It is listed as a catalog or model number. This number is essential for referencing the correct manual, as different models may have specific instructions. Ensure the number matches the manual you are using for accurate guidance. If the model number is not found, digital copies may not be available, so proper identification is crucial for optimal use.
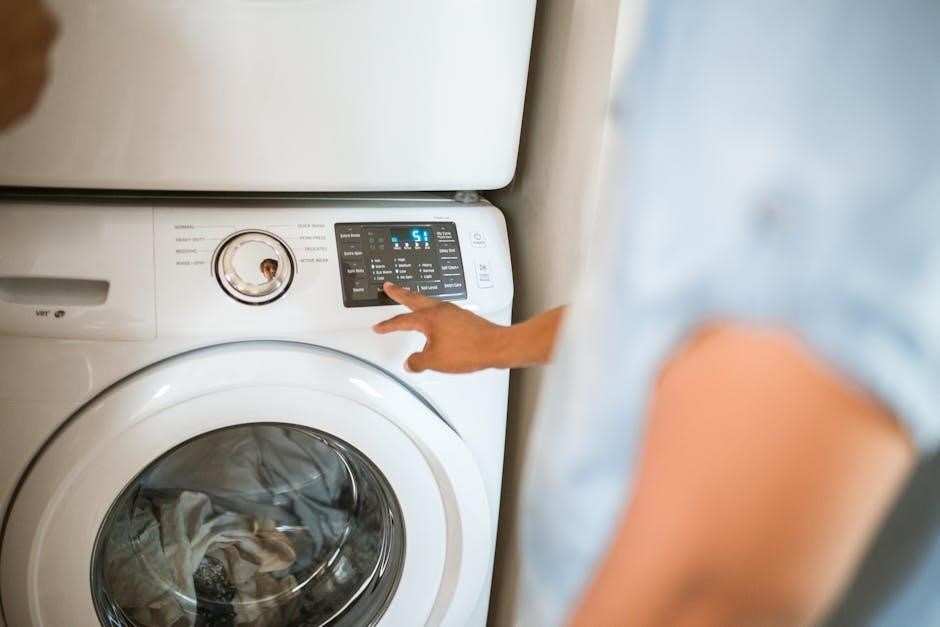
4.3 Understanding the Control Panel and Functions
The control panel of the West Bend Bread Machine features buttons for selecting bread types, crust colors, and timers. It includes a delay start timer for convenience and options for customizing settings like crust color and loaf size. The panel also has a window for monitoring the baking process. Understanding each function ensures optimal use and customization of bread-making settings. Familiarize yourself with the panel to maximize its features and achieve desired bread results efficiently.

Ingredients and Measurements
Use high-quality flour, active dry yeast, and precise measurements for optimal results. Store yeast in the refrigerator to maintain freshness and ensure accurate proportions for consistent bread quality.
5.1 Types of Flour and Yeast Recommended
For best results, use high-quality bread flour or all-purpose flour. Active dry yeast or bread machine yeast is recommended. Ensure yeast is fresh and stored properly in the refrigerator. Measure ingredients accurately, as specified in recipes. Proper yeast activation ensures dough rises correctly. Using the right flour type enhances texture and structure. Always follow recipe guidelines for optimal bread-making outcomes with your West Bend bread machine.
5.2 Importance of Accurate Measurements
Accurate measurements are crucial for consistent bread-making results. Use standard measuring tools to ensure precise quantities of flour, yeast, and liquids. Exceeding or falling short of recommended amounts can affect dough consistency and rise. Measure dry ingredients leveled and liquids at room temperature for optimal performance. Avoid approximations, as this can lead to poor texture or flavor. Precision ensures the perfect balance of ingredients for a flawless loaf every time.
5.3 Storing Yeast for Optimal Performance
Proper yeast storage is essential for optimal performance. Store yeast in a cool, dry place or refrigerate to maintain activity. Use active dry, fast-rising, or bread machine yeast for best results. Ensure yeast is fresh by checking expiration dates, as stale yeast can affect rise and flavor. Refrigeration helps preserve yeast longevity, making it ready for consistent bread-making results. Always measure yeast accurately for desired outcomes.
Basic Steps in Making Bread
Add ingredients to the bread pan, lock it into the machine, select desired settings, and start. Ensure yeast is placed correctly and settings match your recipe type.
6.1 Adding Ingredients to the Bread Pan
Add ingredients in the correct order: liquids first, followed by dry ingredients, with yeast placed in a shallow well on top. Ensure all measurements are precise, especially yeast and liquids. Gently level ingredients to avoid overfilling. Do not mix ingredients before adding to the pan. Handle yeast carefully, as it is sensitive to moisture. Always follow the recipe’s guidelines for proportions to ensure proper dough formation and baking performance.
6.2 Locking the Pan into the Machine
Align the bread pan with the machine’s opening, ensuring it fits smoothly. Gently push the pan down until it clicks securely into place. This ensures proper operation and even baking. Always handle the pan with care, as it may be hot after baking. Use oven mitts or potholders when removing the pan from the machine to avoid burns. A properly locked pan is essential for consistent results and safety.
6.3 Selecting the Desired Settings and Starting the Machine
Select the appropriate bread size, crust color, and desired setting using the control panel. Ensure all ingredients are correctly added and the pan is locked. Refer to the manual for specific program options. Once settings are chosen, press the Start button. The machine will handle mixing, rising, and baking. Allow it to complete the cycle without interruption. Properly set, the machine ensures perfectly baked bread every time. Experiment with settings for customized results.
Advanced Bread-Making Techniques
The West Bend Bread Machine offers advanced features for creating artisan crusts, specialized breads, and custom dough. Use egg washes for golden crusts or experiment with gluten-free flours. The dough cycle allows for homemade pizza or rolls, expanding your culinary possibilities. Explore these techniques to elevate your bread-making skills and create unique, delicious recipes effortlessly with your West Bend machine.
7.1 Creating Artisan Bread Crusts
For a professional finish, brush the dough with a lightly beaten egg white mixed with 1 teaspoon of water just before baking. This creates a golden-brown crust. Ensure the machine is set to the correct cycle for artisan bread, and monitor the baking process. Proper crust formation enhances texture and flavor, making your homemade bread truly artisanal. Experiment with this technique to achieve bakery-quality results consistently;
7.2 Making Specialized Breads (e.g., Gluten-Free, Whole Wheat)
For gluten-free bread, use a 1:1 gluten-free flour ratio and adjust liquid content slightly. Whole wheat bread may require more water due to denser flour. Select the appropriate setting on your West Bend machine, such as the whole wheat cycle, to ensure proper rising and baking. Accurate measurements and ingredient selection are crucial for best results. Always follow the machine’s guidelines for specialized breads to achieve the perfect texture and flavor. Models like 41085 and 47413 support these options seamlessly.
7.3 Using the Dough Cycle for Pizza or Rolls
The dough cycle on your West Bend Bread Machine simplifies making pizza or rolls. It mixes, kneads, and rises dough to perfection. For pizza, remove dough after the cycle, let it rest, and shape as desired. For rolls, divide the dough into portions, let them rise, and bake. Accurate yeast measurements are key for proper rise. Models like 41085 and 47413 excel in this mode, ensuring light and airy results.

Troubleshooting Common Issues
Common issues include dough not rising, uneven texture, or machine malfunctions. Check yeast expiration, ensure accurate measurements, and consult the manual for error code solutions.
8.1 Issues with Dough Rising
Dough rising problems often stem from expired or improperly stored yeast. Ensure yeast is fresh and stored in the refrigerator. Check temperature settings, as yeast thrives in warm environments. Overmixing can kill yeast activity, so follow recipe instructions carefully. Verify measurements of sugar and salt, as excess can inhibit rise. If issues persist, consult the manual or West Bend customer support for tailored solutions.
8.2 Problems with Bread Texture or Crust Color
Incorrect flour types or overmixing can lead to dense bread. Using bread flour instead of all-purpose flour often improves texture. Crust color issues may arise from uneven heating or wrong settings. Ensure the machine is preheated and settings match the bread type; Avoid opening the lid during baking to maintain consistent results. Adjusting ingredient ratios or monitoring the bread during the final stages can help achieve the desired texture and crust color.
8.3 Machine Malfunctions and Error Codes
Machine malfunctions may occur due to power failures or sensor issues. Check error codes in the manual for specific solutions. Common issues include faulty heating elements or malfunctioning timers. Ensure the power cord is securely connected and the circuit is functioning. If errors persist, unplug the machine, wait, and restart. For unresolved problems, contact West Bend customer support for assistance or repair options to restore proper functionality.
Maintenance and Cleaning
Regularly clean the bread pan and machine interior with a damp cloth to remove crumbs and dough residue. Avoid harsh chemicals and abrasive cleaners to prevent damage. After each use, ensure all parts are dry to prevent rust. Check for wear and tear on moving components and replace as needed to maintain optimal performance and longevity.
9.1 Cleaning the Bread Pan and Machine Interior
Cleaning the West Bend Bread Machine is essential for maintaining performance and hygiene. Always unplug the machine before cleaning. Remove the bread pan and wash it with warm, soapy water, rinsing thoroughly. Wipe the machine’s interior with a damp cloth, avoiding harsh chemicals or abrasive cleaners. Dry all parts completely to prevent rust or water spots. Regular cleaning prevents dough residue and ensures optimal bread-making results. Handle hot surfaces with care using oven mitts or potholders.
9.2 Regular Maintenance for Longevity
Regular maintenance ensures your West Bend Bread Machine operates efficiently and lasts longer. Lubricate moving parts annually to prevent friction. Check belts and gears for wear and tear, replacing them as needed. Store the machine in a dry place when not in use to avoid rust. Refer to the manual for specific maintenance recommendations. Proper care extends the machine’s lifespan and maintains consistent bread-making performance over time.

Recipe Ideas and Variations
Explore diverse bread recipes, from classic white to gluten-free and whole wheat. Experiment with garlic, bagels, or artisan crusts for unique flavors and textures, enhancing your bread-making experience.
10.1 Classic White Bread Recipes
Classic white bread recipes are a staple for any bread maker. Simply combine 2 cups of bread flour, 1 teaspoon of salt, 1 tablespoon of sugar, and 1 packet of active dry yeast. Add 1 tablespoon of butter and 1 cup of warm water. Select the basic bread setting and let the machine do the work. Ensure accurate measurements for optimal results. This recipe yields a soft, delicious homemade loaf, perfect for sandwiches or toast. Customize with a brushing of melted butter for a golden crust.
10.2 Specialized Recipes (e.g., Garlic Bread, Bagels)
Elevate your bread-making skills with specialized recipes like garlic bread or bagels. For garlic bread, mix 1 tablespoon of butter, 2 cloves of minced garlic, and 1 teaspoon of herbs into the dough after the first rise. For bagels, shape the dough into rings, boil in water, and bake. Use the dough cycle for precise control. Experiment with flavors like cheese or sesame seeds for unique variations. Always follow basic bread-making steps for best results.
10.3 Experimental Recipes for Unique Flavors
Experiment with creative combinations to craft unique bread flavors. Try adding sun-dried tomatoes, olives, or nuts for savory options, or cinnamon and raisins for sweet variations. For a Mediterranean twist, mix in feta cheese and fresh herbs. The programmable timer and dough cycle make it easy to tailor recipes to your taste. These innovative creations allow you to push the boundaries of traditional bread making and discover new favorites.

Accessories and Additional Tools
Essential accessories include bread pans, paddles, and oven mitts for handling hot parts. Measuring cups and a dough scraper are recommended for precise ingredient preparation and easy cleanup.
11.1 Essential Accessories for Bread Making
Essential accessories for the West Bend Bread Machine include bread pans, paddles, and oven mitts for handling hot surfaces. Additional tools like measuring cups, digital scales, and dough scrapers ensure precise ingredient preparation and easy cleanup. Specialized accessories, such as bagel or roll pans, expand creative possibilities. These tools enhance the bread-making experience, allowing users to achieve consistent results and explore various recipes with ease. They are indispensable for both beginners and experienced bakers alike.
11.2 Recommended Tools for Dough Preparation
Essential tools for dough preparation include dough scrapers, silicone mats, and pastry cloths to prevent sticking and ease cleanup. A digital scale ensures accurate measurements, while a dough whisk or wooden spoon helps mix ingredients thoroughly. For kneading, a stand mixer with a dough hook attachment or a dough roller can simplify the process. These tools enhance dough handling, ensuring smooth preparation and consistent results for various bread recipes.

Warranty and Customer Support
West Bend offers a warranty covering defects in materials and workmanship. For assistance, contact customer support via their official website or consult the product manual for details.
12.1 Understanding the Warranty Terms
West Bend’s warranty covers manufacturing defects for a specified period, typically one year from purchase. It excludes damage from misuse or unauthorized modifications. Registering your product may be required to activate the warranty. Repairs or replacements are handled by authorized service centers. For details, refer to the manual or contact customer support directly. This ensures your bread machine remains in optimal condition, backed by reliable manufacturer support.
12.2 Contacting West Bend Customer Service
For assistance with your West Bend Bread Machine, contact customer service via phone or email. Visit their official website for detailed support options, including online manuals and FAQs. Ensure to use authorized resources for accurate guidance. Referencing the official website guarantees the most reliable and updated information for troubleshooting and maintenance.
The West Bend Bread Machine offers ease, versatility, and consistent results for homemade bread. By following instructions and experimenting with recipes, users can enjoy freshly baked bread with minimal effort, making it a valuable addition to any kitchen.
13.1 Final Tips for Optimal Bread Making
For the best results, ensure accurate measurements and use high-quality ingredients. Store yeast properly to maintain its potency. Regularly clean the machine to prevent residue buildup. Experiment with recipes but follow guidelines for dough consistency. Use oven mitts when handling hot pans, and allow the machine to cool before cleaning. Consistent maintenance and adherence to manual instructions will extend the machine’s lifespan and ensure perfect loaves every time;
13.2 Encouragement to Experiment and Share Recipes
Don’t hesitate to explore new flavors and ingredients—your West Bend Bread Machine is a canvas for creativity! Share your unique recipes with friends, family, or online communities. Document your experiments, noting measurements and settings, to inspire others. Join bread-making forums or social media groups to exchange ideas and discover innovative techniques. Every loaf tells a story, so embrace the joy of creation and share your culinary adventures with the world!